Category Archives: Art “Therapy”

I need a hobby

Standard

I am seriously bored. Bored, bored, bored.

Not like I don’t have things I could do. Things I should do. I’ve even been cleaning like crazy, and that is so not like me.

I just miss my daughter so dang bad! I am realizing that she is my “go to” person for most of what I do. Shopping, movie watching, etc. Which some would say is bad or co-dependent or something… I just say she is one of my favorite friends and we have a lot in common and a lot of fun together. I don’t necessarily think that’s a bad thing.  However…

Maybe I need to branch out a bit more. Strengthen some of my other friendships. Join a book club or a crafting group. I don’t know. I’d have more to  do if I had my own home… I mean, first because there is always something needing doing if you have a house, and second because I had all my supplies to do projects in, and that was always the first thing I’d pile into when I had a spare moment. Still – I find that although I am enjoying the quiet of my daughter being away, I don’t know what to do with myself. And since she will eventually move away for good – and in fact, in this coming school year she will probably find more friends of her own to hang out with rather than just mom – I better find something to occupy my time!

When “easy” projects go bad ~ re-covering a chair

Standard

My daughter has been suffering thru the entire school year with a semi-broken desk chair; until fairly recently I had the brilliant idea of pulling one of our old chairs out of storage for her to use. Yeah, okay, that’s not like a flash of brilliance, is it, to use something you already own but forgot about? Our stuff has been in storage for far too long! Two trips across county and five years in storage… urrrrrr. Anyhoo…

What a great plan! So I took her to the fabric store to pick out some material she’d like the seat covered in because that’s easy to do. I mean, I’d done it before and it was easy.

I don’t know what went wrong. Well, first of all, the seat frame was broken (the thing is over a hundred years old, I don’t blame it) so I asked my dad if he could fix it. Well, would fix it… of course he could. And as expected, he did a better-than-necessary job. But. Whereas before I would have just tacked the new fabric over the old (which I had done once, and apparently, as dad discovered while pulling it apart, had been done 4 times previously!) well, he stripped it down to the hundred year old cotton stuffing, so I had to start from scratch.
Here you can see all the holes in the frame from the multiple tacks used over time to hold all that fabric –IMG_1578

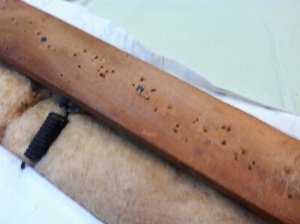
Mom helped me sew some muslin around the inner wire frame, then dad put all the parts back together… I just needed to recover it. Just.

I got it started so nicely, all smooth front and back. When I turned it over to check it out, I realized the pad had slipped back so you could feel the wood frame in front – because that’d be comfy. Plus, there was a weird lump. I didn’t remember there being any lumps. So I had to pull out the tacks and start over! I hate that. Turns out it was a blessing in disguise though because that weird lump turned out to be an old rusty upholstery tack that somehow had gotten stuck up in the pad – someday some poor sitter would’ve gotten stuck in the bum! I decided, since I was back at step 1, that a hundred years of sitting had made it kinda wimpy, anyway, so I asked mom for some batting and put another layer of soft on the seat. Much better.

At one point my husband came out and tried to help me. Why? WHY?? He’d love to think of himself as “handy”, but he’s just not. I mean, he does a lot of good stuff, but he is no craftsman. So, after he messed things up, and lost a couple tacks on the shop floor (a shop I quite often go barefoot in) I kindly (sort of) told him I was done with his help…

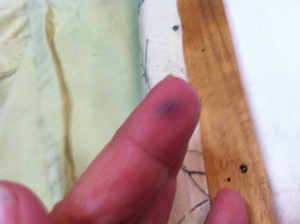
By then I was cranky, and quite possibly having a hot flash, so I got in a big hurry and managed to pinch my finger with the hammer. I don’t think I’ve done that in… decades.

IMG_1582

Of course for the life of me I couldn’t get the stupid corner to tuck correctly. I re-did it three times then used the old family cry of “good enuf fur who it’s fur”.

IMG_1584

The back corners worked beautifully, of course.

IMG_1585

I have this curse of perfectionism that causes me to quite often not do things at all, because I know I can’t do them perfectly. It’s why it took me weeks to get around to doing this chair once I had the idea. I hate little imperfections in what I make. I am working on overcoming that… which is why I will call this chair fine, even if the corners annoy me, and I wish the seat were firmer, or more stuffed. It’s fine. Dad will screw the seat back down for me tomorrow, and it will be just fine.

IMG_1586

And Kiki will have a desk chair to sit at her school computer. Now that she has 3 whole days of school left in this year.

…sigh…

That’s okay. She’ll still have a desk in her room, and she can still use a chair to sit in.  If not I’ll recover it and put it in my room! Ha.


Christmas Craft ~ Big Felt Robot

Standard

christmas 2012 049

This hasn’t neccessarily been my year for crafting. I got really upset last summer – two summers ago, actually – when the medication my doctor prescribed for my pnuemonia wreaked havoc on my system, including the loss of the use of my right thumb. Everything I tried doing – crafty or otherwise – was incredibly hard and discouraging. I set aside several projects I’d been working on and have yet to restart them.

It’s been a long year and a half but I have regained most of the strength in my arms and my thumb is usable, although it doesn’t quite have the dexterity it once did. I have hope that it may come back completely, but it’s been a process for sure.

Anyway, this year I did decide to try a couple craft projects as gifts. I painted a couple things, one of which I have yet to finish (yeah, yeah, I know – Christmas was a week ago!) I sort of ran out of time. Our entire household has been battling the flu, and as “last one standing” I had way too much on my plate.

This particular project, the stuffed robot, I made for my youngest niece. Still, she’s 13, so I wasn’t sure if she’d love it or wonder “What the heck is my Auntie thinking?!” It was, of course, much more difficult and time consuming that I’d planned; I was actually going to use a blanket stitch around each of the cubes, but ended up only doing his head and sewing the rest of the cubes on the machine …  and I was thinking that if my niece didn’t love it he was going to be a huge waste of time! I am glad to report that she LOVED him!! I haven’t seen her that excited in awhile 🙂 I also had sprayed my perfume on the stuffing (she always tells me she loves how I smell, lol) and she just hugged him and sniffed him for ages. It was so worth the effort!

christmas 2012 048

It’s done ~ my Paper Tree

Standard

Well, on close inspection you can find plenty of flaws… pencil marks I can’t get erased, chunks and tears in the paper and foam core, and I even accidentally “pruned” a couple leaves off! However, at an ‘over all’ glance, it looks pretty decent. I hope my sis is happy with it.  I will try to get a couple pics tomorrow when it’s in use so you can see what it’s used for!

(the slits are so you can slip it together to stand up)


Another craft project – Paper Wish Tree

Standard

My sister is throwing a baby shower for her daughter-in-law, (her first grandbaby!!) and we were looking for decoration ideas. She found this tree thingie – it’s made of “heavy-weight” paper, and it stands up and you can put hand written “wishes” on it, or money, or, whatever I guess, as long as it’s lightweight.  This piece of paper, however, costs $40.!  Sheesh! So of course I have to open my big mouth and say “Gosh, couldn’t you just make this out of that foam-core posterboard?”

Yeah. Guess what I’ve been doing tonight?

Started with posterboard and some tree ideas…


Sketched a tree onto one half of the board…

Then I asked my dad if he had an exacto knife. Now, asking my dad if he has a tool is like asking Purina if they make dog food.  I mean, duh. So I knew he’d have one… but HOLEYCOW!! 

This is what he brought out…

My dad is da‘tool bomb! Really, who has this stuff??!

Look – it even has little saw blades!

So. Cool.

Well, cutting through that foam-core poster board was way harder than I thought it would be. Of course. I may never be able to bend my wrist again. But,  I have one side cut out.  Urgh. One more to go…

It’s all over but the carnage (also, 2 more Christmas gift craft ideas)

Standard

Welcome to The Day After.


Actually, it’s never too bad at our house.  As soon as the stockings are emptied, before the unwrapping begins, someone goes and grabs a trashbag and we clean as we go.  Still, at this point we are left with dozens of boxes that need to be put somewhere, and gifts and stuff that need to be put away in an already full house.

The space under the tree is empty. (My dream is one day to have a not-cheesy-tree-skirt…and a real tree.  I can’t stand fake ones, but such is life at the moment.  So no giggling at mine.)

Stuff needs to go someplace… soon…

One of my fave gifts this year is a new coffee cup!  I’ve been wanting one that is just mine and just right (I’m rather picky.) Living in my folk’s house, I’ve just used theirs; I mean, it’s not like we’re gonna unpack a kitchen box or 12 just to find my favorite coffee mug.  So here is my new one!  I actually picked it out; Kiki and I were shopping and I loved it, so she “snuck” it into my shopping cart, lol. We do that when she’s Christmas shopping for me.  (Gosh, at World Market this year she picked out a bunch of stocking stuffers for me, put her little handbasket in my cart, and had me look the other way while she placed them on the counter and the gal bagged the stuff!) Yeah, obviously I paid for my own stuff, but it’s the thought that counts..?

It’s beautiful, a white-on-white design.  The picture really doesn’t capture just how pretty it is.  I adore little wild birdies – the other gift she picked out for me (again, while we were together, this time at the tree festival!) was this little snowy, pineconey guy that I set with a couple of my other birdie friends –

Oh! Here are some pics of more craft – gift projects.  One is another ‘thrift shop plate and cups’ jewelry holder for one of my nieces.  Her room is painted with these huge circles on the walls, so we were so excited to find this plate!

The other is a stuffed animal (well, it might be an animal. I dunno) that is made from a sock. This was a last minute gift (for Kiki’s stuffie friend) so altho it would have looked nicer with an embroidered face, I just used a Sharpie and called it good.  It only took about a half hour or so to make.  Would’ve been quicker if I’d sewn it on the machine but everyone was in bed so I didn’t want to make noise (the sewing room is across the hall from my parent’s bedroom.)

Well, it’s nearly 2pm, so perhaps I should go take a shower now.  I hate to leave the quiet of the moment, as everyone else is out and about and I have a little time to myself – which is rare here.  I am loving it!  However, they will be returning soon, so I guess I should get dressed or something….

Hope everyone had a wonderful (at least mostly wonderful) Christmas!

Cheap Christmas Craft – mug and saucer jewelry holder

Standard

We are pretty strapped financially this year, as are so many people in this lousy economy.  I really wracked my brain to dredge up some ideas for gifts that wouldn’t cost much.  This gift was, by far, the least expensive thing I came up with!  The following pictures are the one I made for Kiki; I will post pics of two others we are making after they are done.  (for a couple of her cousins)

I bought the “parts” at the thrift shop – 50 cents apiece for the cup and plate, and 20 cents for the spoon.  I had the glue, so of course that didn’t cost me anything… altho, if you had to buy it (E6000) I think it’s around $4.00 a tube, and it will go a looooong way…

So, total cost to me on this gift – $1.20.

I glued the mug to the side of the plate, and the spoon inside the mug.  I had to hammer the spoon a bit to get it at the correct angle.


A different view –

See how you can put necklaces in the mug, or on the saucer, and hang earrings over the edge? Also, rings can slide down the spoon (not all rings, the spoon is sort of thick so it depends on the size of your rings – of course, the new fashion rings with stretchy bands will go, and that’s most of what the girls have right now!)

Advent Calendar Wreath – post try 2

Standard
Alrighty – I will attempt to post these pictures so you can see what I did!  Here we go….
 
 
Look close – you’ll see all the glitter I dumped in the grass!  Sheesh…


So I spray painted the grapevine wreath silver –
 
 
I bought some ‘candy favor boxes’, 24 for only $4.35.  24 boxes – perfect!
 
 
After I numbered them, I realized they would be hanging lengthwise, so I probably should’ve written on them sideways instead –


I painted some and put a few stickers on…
 
 
It made the cat happy… then they were ready to fill


I used a hole punch to make a hole in each box, then hung the boxes from the wreath with ornament hooks –
 
 
Hanging it was the harderst part!  I used one of those 3M removable hook deals, but the ceiling there is over 9′ high… I am 5’2″… I had to use a stepladder AND a really long stick to put it up there!!  But it’s ready to count down the days ’til Christmas!
 
 
p.s.  Oliver is doing well, ya think?


Christmas Craft! Advent calendar hanging wreath

Standard
You’ve heard the saying “Necessity is the mother of invention”? Yes, well, you may be seeing a lot of crafts on my blog in the next few weeks, since Christmas is coming up and our funds are rather low.  I have some great ideas… we’ll see what I actually get accomplished.

Todays craft was also created out of necessity.  Kiki wanted an advent calendar.  We’d seen a few at World Market a couple weeks ago, but the ones they had left were a little… well, the ones in the ad paper were cuter, and we innocently assumed they’d get some more in soon. Well, when we returned on the last day on November they had one left… one that looked as though it had been run over by a shopping cart.  Shoot.  We went to a total of 5 stores searching for an advent calendar.  Each place either never carried them this year, or were completely sold out.

ARE YOU KIDDING ME????  Christmas. No advent calendars. Weird.
 
So I promised Kiki I’d make her one.  But I had to keep it cheap.  I spent some time after dropping her off at the co-op wandering a few stores and finally came up with an idea!  See, I had some craft supplies I’d picked up last year after Christmas to make a hanging wreath
for this year.  So, I’d tweak it a bit. All I needed was a few boxes and some stuff to stick in them (mostly candy!) and “voila”! Advent calendar.

 Here are some pics of what I had and the process:

I started with a grapevine wreath


 OKAY!  I am really really really irritated!!  My picture uploads are not working at all!!  It all looks great until I actually get it posted, then it’s all wonky and missing stuff and mIxed up… i AM GETTING REALLY PISSED OFF SO IT’S TIME TO QUIT!!  I’ll try again tomorrow I guess…
 

Getting ready for a pirate (of the Caribbean) party! Awesome pirate flag/jolly roger cake

Standard

Kiki’s birthday is Sunday, and since her current obsession is Pirates of the Caribbean (or, more specifically, Jack Sparrow and Will Turner!) that is her party theme.

I really needed to not spend as much money on her party as I have in the past, (I tend to go a little crazy) so we scoured thrift stores and discount places for the things we needed… and did we luck out!  We found all kinds of stuff that looks like treasure and other piratey things.  Then we happened to have some other stuff in the storage unit (like dress-up jewelry) that we were actually able to find…  I am going to make a pirate sail, – a Black Pearl sail, of course!  – and if you can believe it, I actually found a black sheet at the thrift store!  How likely is that to happen??

So, the table is set…

(ignore the rubber bands on the top of the candleabra… I’m trying to ‘tweak’ it a bit…)

Then there is the cake.  It rocks!!  I did an amazing job, if I do say so myself. 🙂

I went the lazy route and used a (modified) cake mix, so of course it wanted to fall apart… unlike a good scratch-made cake… oh well. It worked.

Here was my inspiration ~

So I covered the cake first with buttercream icing:

Then fondant ~

added the details ~

put silver lustre dust on the coins ~

Pretty awesome, huh??!